Windows Server Launch Game

TheGame

If you played the Window Server Launch sweepstakes game you may be having trouble finding out who won. My final position was something like 160th, so I think I was in with a 1:50 chance of winning.  Not too bad.  Though because I’ve still not heard anything yet, and that it’s been 2 weeks since the game has finished, I don’t think I have won.

HOW CAN YOU FIND OUT WHO WON?

To request a list of winners who received a prize worth $25.00 or more, send email with the subject line “Windows Server 2012 Virtual Launch Winners” to launch12@microsoft.com by October 30, 2012.

WHO IS SPONSORING THIS SWEEPSTAKES?

Microsoft  Corporation
One Microsoft Way
Redmond, WA 98052

Testing unattended windows installations

If you are creating unattended.xml files to use to perform automated installations of windows then you will at some point want to test it.  This is fine if the destination system has a keyboard and monitor but in my case the system I am targeting does not, a HP MediaSmart EX490.

The simplest way I found on Windows 8 to do the testing was to use the Hyper-V role.  Normally I prepare a USB stick with the Microsoft USB/DVD Download Tool and then copy the autounattend.xml file to the root of the USB disk.  However, during installation Windows will search for an autounattend.xml or unattend.xml on other removable devices.  Using this we can setup a Hyper-V VM with two DVD drives.  One with the installation media in the other with just the autounattend.xml

I found on the internet a PowerShell script, New-IsoFile that will create an ISO from a list of files.  Credit goes to Chris Woo and information can be found at http://gallery.technet.microsoft.com/scriptcenter/New-ISOFile-function-a8deeffd

Below is my PowerShell script that I use.  Basically it uses Chris’s New-IsoFile function to create an ISO with the autounattend.xml file in it.  It then creates a VM, attaches the Installation ISO (in this case Hyper-V Server) and the answer file ISO and starts the VM.

function New-IsoFile { <# .Synopsis Creates a new .iso file .Description The New-IsoFile cmdlet creates a new .iso file containing content from chosen folders .Example New-IsoFile "c:\tools","c:Downloads\utils" Description ----------- This command creates a .iso file in $env:temp folder (default location) that contains c:\tools and c:\downloads\utils folders. The folders themselves are added in the root of the .iso image. .Example dir c:\WinPE | New-IsoFile -Path c:\temp\WinPE.iso -BootFile etfsboot.com -Media DVDPLUSR -Title "WinPE" Description ----------- This command creates a bootable .iso file containing the content from c:\WinPE folder, but the folder itself isn't included. Boot file etfsboot.com can be found in Windows AIK. Refer to IMAPI_MEDIA_PHYSICAL_TYPE enumeration for possible media types: http://msdn.microsoft.com/en-us/library/windows/desktop/aa366217(v=vs.85).aspx .Notes NAME: New-IsoFile AUTHOR: Chris Wu LASTEDIT: 03/06/2012 14:06:16 #> Param ( [parameter(Position=0,Mandatory=$true,ValueFromPipeline=$true)]$Source, [parameter(Position=1)][string]$Path = "$($env:temp)\" + (Get-Date).ToString("yyyyMMdd-HHmmss.ffff") + ".iso", [string] $BootFile = $null, [string] $Media = "Disk", [string] $Title = (Get-Date).ToString("yyyyMMdd-HHmmss.ffff"), [switch] $Force )#End Param Begin { ($cp = new-object System.CodeDom.Compiler.CompilerParameters).CompilerOptions = "/unsafe" if (!("ISOFile" -as [type])) { Add-Type -CompilerParameters $cp -TypeDefinition @" public class ISOFile { public unsafe static void Create(string Path, object Stream, int BlockSize, int TotalBlocks) { int bytes = 0; byte[] buf = new byte[BlockSize]; System.IntPtr ptr = (System.IntPtr)(&bytes); System.IO.FileStream o = System.IO.File.OpenWrite(Path); System.Runtime.InteropServices.ComTypes.IStream i = Stream as System.Runtime.InteropServices.ComTypes.IStream; if (o == null) { return; } while (TotalBlocks-- > 0) { i.Read(buf, BlockSize, ptr); o.Write(buf, 0, bytes); } o.Flush(); o.Close(); } } "@ }#End If if ($BootFile -and (Test-Path $BootFile)) { ($Stream = New-Object -ComObject ADODB.Stream).Open() $Stream.Type = 1 # adFileTypeBinary $Stream.LoadFromFile((Get-Item $BootFile).Fullname) ($Boot = New-Object -ComObject IMAPI2FS.BootOptions).AssignBootImage($Stream) }#End If $MediaType = @{CDR=2; CDRW=3; DVDRAM=5; DVDPLUSR=6; DVDPLUSRW=7; ` DVDPLUSR_DUALLAYER=8; DVDDASHR=9; DVDDASHRW=10; DVDDASHR_DUALLAYER=11; ` DISK=12; DVDPLUSRW_DUALLAYER=13; BDR=18; BDRE=19 } if ($MediaType[$Media] -eq $null) { write-debug "Unsupported Media Type: $Media"; write-debug ("Choose one from: " + $MediaType.Keys); break } ($Image = new-object -com IMAPI2FS.MsftFileSystemImage -Property @{VolumeName=$Title}).ChooseImageDefaultsForMediaType($MediaType[$Media]) if ((Test-Path $Path) -and (!$Force)) { "File Exists $Path"; break } if (!($Target = New-Item -Path $Path -ItemType File -Force)) { "Cannot create file $Path"; break } } Process { switch ($Source) { { $_ -is [string] } { $Image.Root.AddTree((Get-Item $_).FullName, $true); continue } { $_ -is [IO.FileInfo] } { $Image.Root.AddTree($_.FullName, $true); continue } { $_ -is [IO.DirectoryInfo] } { $Image.Root.AddTree($_.FullName, $true); continue } }#End switch }#End Process End { if ($Boot) { $Image.BootImageOptions=$Boot } $Result = $Image.CreateResultImage() [ISOFile]::Create($Target.FullName,$Result.ImageStream,$Result.BlockSize,$Result.TotalBlocks) $Target }#End End }#End function New-IsoFile # Begin script by Albal to create New-VM based on autounattend.xml - # Assumes all required files are in, and will be written to <USER>\Downloads # Change the below parameters if needed $path = [Environment]::GetFolderPath("UserProfile") + "\Downloads" $name = "Hyper-V Server 2012" $switch = "vSwitch" # Don't change anything below this line - ignore the errors below, just in case you run the script again without having exited expectedly Stop-VM -Name $name -Force -TurnOff Remove-VM -Name $name -Force del -Force $path\auto.iso del -Force $path\hyper-v.vhd dir $path\autounattend.xml | New-IsoFile -Path $path\auto.iso -Media CDR -Title "Unattend" New-Vm -Name $name -SwitchName $switch Set-VMProcessor -VMName $name -Count 1 Set-VMMemory -VMName $name -StartupBytes 2147483648 New-VHD -Path $path\hyper-v.vhd -SizeBytes 21474836480 Add-VMHardDiskDrive -VMName $name -Path $path\hyper-v.vhd -ControllerType IDE -ControllerNumber 0 -ControllerLocation 0 Set-VMDvdDrive -VMName $name -Path $path\en_microsoft_hyper-v_server_2012_x64_dvd_915600.iso -ControllerNumber 1 -ControllerLocation 0 Add-VMDvdDrive -VMName $name -Path $path\auto.iso -ControllerNumber 1 -ControllerLocation 1 Start-VM -Name $name echo "When you press enter the Virtual Machine will be stopped and deleted" pause Stop-VM -Name $name -Force -TurnOff Remove-VM -Name $name -Force del $path\hyper-v.vhd del $path\auto.iso


Simply run the Script and Open the VM in Hyper-V Manager, you can then verify the automated install works and if not have an easier time of debugging the situation than if you were running on a headless system.

Unattended install of Microsoft Hyper-V Server 2012

Microsoft Hyper-V Server 2012 is a free version of Windows Server 2012 that only supports the Hyper-V role. You can use this to install on bare metal to give you a hyper visor that can support virtualisation. In this article I will be looking at how you prepare an image and configuration file (autounattend.xml) to target a server for a hands off installation.

Resources you will need

Download the ISO, install the DVD tool but when you come to install the ADK only install the Deployment Tools:

adk1

You will need to run the Windows System Image Manager:

wsim1

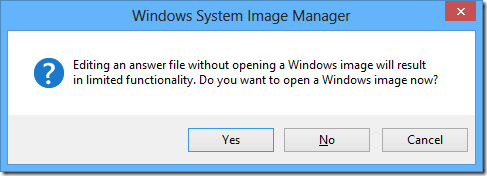
First mount the ISO on a local drive or open it in another program to extract the install.wim file from the sources folder.  Save this file to your local hard disk.  From the File Menu select New Answer File… then choose Yes to Open a new Windows Image:
wsim2

Select the Windows install.wim Image that you copied from the Sources folder earlier:

wsim3

Then select yes to create the catalogue file.  This will take a few minutes.  At this point you could use the USB/DVD download tool to create your bootable USB drive. A 2GB USB Drive will do fine for this.

When the creation of the catalogue file has completed you will need to add a number of configuration options from the Windows Image section in the bottom left of the Windows System Image Manager window to the Answer File.  You do this by opening the Components Tree and right-clicking on a Component with the mouse and selecting the appropriate phase to add it to.  You will then see the Answer File populate with the Configuration Option that you can edit later.  I will details the Configuration Options you need to add to your answer file to enable an unattended install of Windows Hyper-V Server 2012.

Add the following to 1 windowsPE:

  • amd64_Microsoft-Windows-International-Core-WinPE
  • amd64_Microsoft-Windows-Setup

Add the following to 4 specialize:

  • amd64_Microsoft-Windows-Shell-Setup
  • amd64_Microsoft-Windows-TerminalServices-LocalSessionManager
  • amd64_Microsoft-Windows-TerminalServices-RDP-WinStationExtensions
  • amd64_Microsoft-Windows-UnattendedJoin

Add the following to 7 oobe System:

  • amd64_Microsoft-Windows-Shell-Setup

wsim4

Remove any items from the tree that you may have that are not shown above.  They will not be needed.

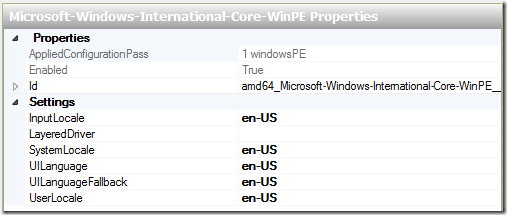
Go back to the top of the Tree and Select amd64_Microsoft-Windows-International-Core-WinPE.  For Input Local, SystemLocale, UILanguage, UILanguageFallback and UserLocale enter en-US
wsim5

Select SetupUILanguage and set UI Language to en-US and WillShowUI to OnError

wsim10

Select amd64_Microsoft-Windows-Setup, set EnableFirewall to False and EnableNetwork to True

wsim6

Then select DiskConfiguration right click and select Insert New Disk. Set the DiskID to 0 and set WillWipeDisk to True

wsim11

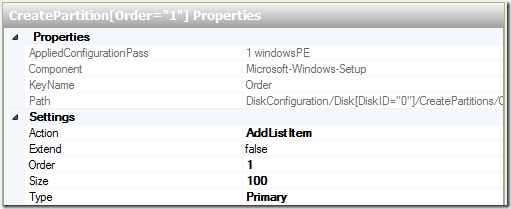
Right click on CreatePartitions and select Insert New CreatePartition on this set Order to 1, Size to 100 and Type to Primary
wsim12

Do the same again but set the Extend to true, Order to 2 and Type to Primary

wsim13

Move down to ModifyPartitions right click and select Insert New ModifyPartition, set Active to True, Format to NTFS, Label to Boot, Order to 1 and PartitionID to 1

wsim14

Do the same again but don’t set Active,set Label to System, Order to 2 and PartitionID to 2

wsim15

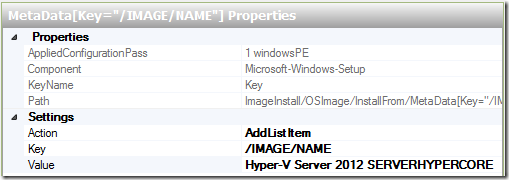
Select Image install right click and select Insert New OSImage. Set InstallToAvailablePartition to False and WillShowUI to OnError.  Select InstallFrom, right click and select Insert New MetaData.  Set the Key to /IMAGE/NAME and set Value to Hyper-V Server 2012 SERVERHYPERCORE. Remove Credentials
wsim16

Select InstallTo and set DiskID to 0 and PartitionID to 2

wsim17

Select UserData and set AcceptEula to True, FullName to User and Organization to Company

wsim18

Select amd64_Microsoft-Windows-Shell-Setup, set ComputerName to HYPER-V-01, set RegisteredOwner to User and set TimeZone to UTC

wsim7

Select amd64_Microsoft-Windows-TerminalServices-LocalSessionManager and set fDenyTSConnections to False

wsim8

Select amd64_Microsoft-Windows-TerminalServices-RDP-WinStationExtensions, set SecurityLayer to 1 and UserAuthentication to 0

wsim9

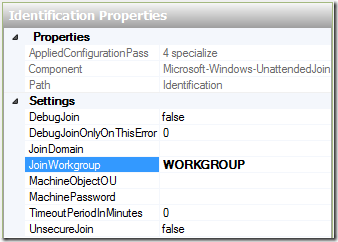
Select amd64_Microsoft-Windows-UnattendedJoin and then Identification, in this case we are setting to join a Workgroup so set JoinWorkgroup to WORKGROUP
wsim19

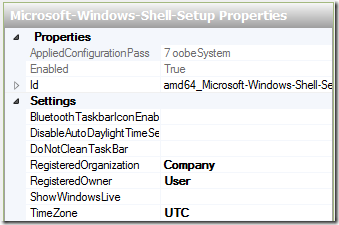
Navigate to amd64_Microsoft-Windows-Shell-Setup and set RegisteredOrganization to Company, RegisteredOwner to User and TimeZone to UTC
wsim20

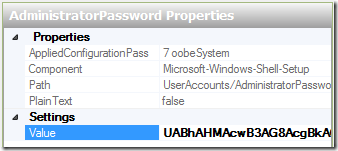
Select AdministratorPassword and for Value type in the password you want to use, in clear text. Later WSIM will encrypt the password.  Don’t forget it.
wsim21

From the Tools menu select Validate Answer File and in the message windows verify that No warnings or errors are shown.  From the File menu select Save As… and use the filename autounattend.xml to save the file to your local disk.  If you are going to boot the system from USB and you are confident that it will work then you can copy the XML file to your USB stick once you have prepared the USB stick using the Microsoft USB/DVD Download tool.

In my next article I will show you how to verify your unattended install in Hyper-V.  This is very useful for proving your answer file where it will be used on a headless system.